mySoftware [Updates]
newProducts [YOK]

How to make a WAV or AIFF for CD/MP3 creation
Creating your own .WAV or AIFF data for making a CD or conversion to MP3… There are many ways to do this actually. Below we will outline the following different methods.
Method 1 - Audio Record/Playback directly from USB drive (result will be a .wav file)
Method 2 - Record to DAW software like Steinberg Cubase AI (result will be a .wav file)
Method 3 - Record to external handheld device like Yamaha PockeTrak. (result will be a .wav or an mp3)
Method 4 - Resample (requires RAM expansion on the Motif XS/ can be done directly to SDRAM on the Motif XF) - (result will be a .wav file)
Method 5 (Motif XF only) - Record audio wirelessly directly to any iPhone/iPad in the area using Wifi USB device. (result will be a .wav file)
METHOD 1: AUDIO RECORD/PLAYBACK from USB drive/Ethernet Connection
The quickest/easiet way to transfer your sequences to .WAV. This function found on the XF, and added with Operating System 1.50.xx and later on the Motif XS, allows you to record from your Motif XS/XF directly to the USB drive plugged into the USB TO DEVICE port. This function is added to the [FILE] function.
Connect your USB drive and select the SONG you wish to record (or PATTERN Chain)
(You can record your playing “live” if you wish to simply record a solo piano performance, for example) Simply select the mode you want to work in first, then:
Press [FILE]
Press [F4] AUDIO
Press [SF1] REC
Give the wave file a name and press [ENTER]
Set the required trigger level.
If you set the trigger level to “manualâ€, recording will begin whenever you press the [ENTER] button. Alternatively, if you set a value between 1 and 127, recording will begin automatically whenever the playback volume exceeds that level. The level set here will be indicated by red triangles in the level meter. For best results, set this parameter as low as possible to capture the entire signal, but not so low as to record unwanted noise.
Press the [ENTER] button.
If you have set the trigger level to “manualâ€, recording will begin immediately and the displayed status will change from “STANDBY†to “RECORDINGâ€. If you have set a value between 1 and 127 as the trigger level, the displayed status will change from “STANDBY†to “WAITINGâ€.
If you set the trigger level to a value between 1 and 127, recording will begin automatically whenever the playback volume exceeds that level; furthermore, the displayed status will change from “WAITING†to “RECORDING†at that time. If you want to include the currently-selected Song or Pattern in your recording, press the SEQ TRANSPORT [F] (Play) button at any time to start playback. You can also press one of the Number buttons [1] – [16] while recording to change parts if you are going to play along with your sequence.
Via this method you can record a maximum file of 74 minutes continuously (whew!) or to the limit of your drive size, whichever comes first. Additionally, if you have an Ethernet Network connection established between your Motif XS/XF and your computer, you can record directly to that computer or any of its shared assests using this same method.
METHOD 2: Record to DAW (Like Cubase AI)
Another alternative is to record the audio output of your Motif XS/XF to Cubase… this requires an audio interface (like the firewire ports built in to the XS8 and optional for the XS6&7, or the optional FW16E if you own a Motif XF) or an external audio interface like the AudioGram3 or AudioGram6.
From the computer you can easily export a WAV, AIFF or make an MP3.
Please see the extensive material included with Cubase AI for details on audio recording in Cubase.
METHOD 3: External Recording Device
And alternatively you can invest in a Yamaha Pocketrak. You can record directly to these devices as well.
These hand-held recording devices can record “live” audio in full PCM 44.1kHz quality or you can create MP3 directly recording from your keyboards outputs…
METHOD 4: RESAMPLING (If you have an XS this requires DIMMs)
The process of resampling is simply taking the MIDI sequence data you have recorded to the Motif XS/XF sequencer and creating an audio file from it. This audio data can be saved as .wav or AIFF to your USB drive and then later converted to mp3 or burned to CD (with computer software). The creation of the WAV or AIFF data can be accomplished completely on board the Motif XS/XF using the INTEGRATED SAMPLING function called RESAMPLE. Basically the audio generated by the XS tone engine is re-routed to the XS/XF Integrated Sampler where you can record it can create a .wav (Windows PC format) or an AIFF (Macintosh format) file.
What is required:
_ You must expand your Motif XS with DIMMs (please see the Motif XS Owner’s Manual page 295 for details on DIMMs type and installation).
_ If you have a Motif XF you have 128MB of SDRAM built-in to the basic unit, no expansion is necessary to create .wav
First: Create you musical composition in the Motif XS/XF sequencer. Make a note of how many measures your composition is so you know how to set the resample length. [STORE] your Sequence and Mix and then [SAVE] the data to a USB drive as an ALL data file. Do this before resampling… (the data generated in the resample will temporarily be housed on a track - but we will not be storing the waveform on the track, we just want to add the waveform to our list of user samples… this is why it is critical to save your song data to USB drive prior to resampling.
Setup your sequence so you have it sounding like you want…
Press [INTEGRATED SAMPLING]
Press [F6] REC => to see the RECORD SETUP screen
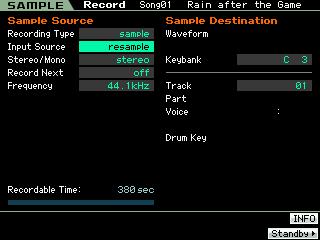
Set the RECORD TYPE = “Sample”
Set the INPUT SOURCE = “RESAMPLE”
Set MONO/STEREO = “Stereo”
Set the FREQUENCY = “44.1kHz”
KEYBANK = C3
TRACK = 01
You can select Track 1 even if data is recorded on Track 1 because we are only going to save the audio waveform data generated by the resample. So what is currently on track 1 will not be harmed.
In the sequencer only MIDI data is recorded to tracks. Samples are separate.
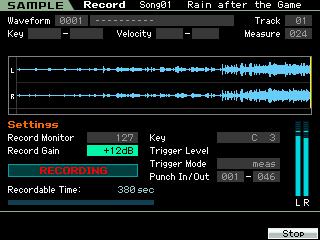
Press [F6] STANDBY => to see the STANDBY screen
Check your level on the meter - you can press play to test the levels you will hear your song and see its output level on the meters.
Use the REC GAIN control if you need to adjust the level: -12, -6, 0, +6, +12
How much level you are getting is a result of the combination of the volume settings of the tracks playing and the velocity with which you played those tracks.
Set the TRIGGER MODE = MEAS (measure)
Set the recording from measure: 001 - xxx
...where ‘xxx’ is one measure beyond the length of your song. If your song is 100 measures, for example set the PUNCH IN/OUT = 001~101
Cue your Sequence to the [|<] TOP
Press [F5] START
WAITING will appear…
Press the sequencer [>] PLAY button this starts the sequencer and sampling automatically.
You will see the sampler draw the waveform as it records.
When complete the sequencer and sampling will automatically STOP
You can AUDITION your recording (anticipate that the volume will be slightly lower as you are now listening to playback and not the source.
Press [ENTER] to keep the recording.
“Press [ENTER] to fix”
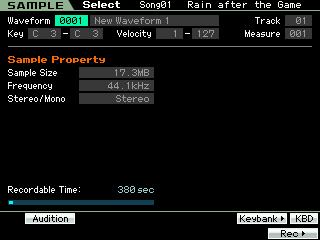
Your waveform has been added to the list of samples in RAM.
You can press [EXIT] to back out of the SAMPLE area and return to the SAMPLE SELECT screen. You will find your WAVEFORM listed on the SAMPLE SELECT screen.
Press [JOB]
Press [F1] KEYBANK
Select JOB 4: Normalize
Press [ENTER]
Normalize is a function that increases the output level of your sample. Be careful not to over boost your waveform. You can increase the output level of the waveform
On this screen you can AUDITION you waveform
Set a % of Normalization 1-800%
Press [SF4] APPLY
The XS will process the wave (non-destructively) and allow you to audition the results. Make sure you do not over boost the waveform - if you get distortion, press [SF4] APPLY again to undo.
Try a lower amount of Normalization until you get satisfactory results.
Press [ENTER] to permanently change the waveform. “Press [ENTER] to fix”
You can now go to FILE and save this data as a WAV file or AIFF file TYPE.
Press [FILE]
Select TYPE = WAV or AIFF
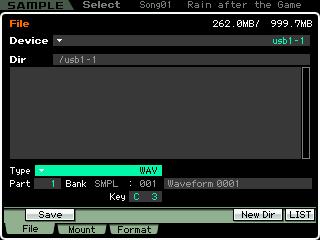
Press [SF1] SAVE
A screen showing the KEYBANK and AUDITION function will appear. You can verify that your data is selected by holding down the AUDITION button [SF1]
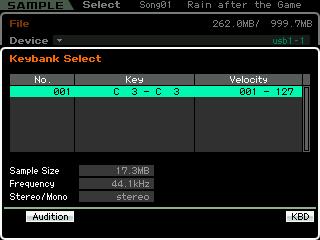
Press [ENTER]
The File Name screen will appear - give your audio file a name.
Press [ENTER]
A Wav or AIFF format file will be created at full CD quality (16-bit/44.1kHz sampling rate). You can then shuttle this from your USB drive to your computer and burn your CD or transfer it to mp3 format.
(mp3 format is a compressed format that creates a much smaller file capable of emailing to friends or posting on the Internet).
METHOD 5: CLOUD AUDIO RECORDER FOR MOTIF XF. (Motif XF only)
This app for iPhone/iPad allows you to record wirelessly direct from your XF to any iPhone or iPad within range, via a compatible USB Wifi stick attached to your XF. The result is a 16-bit, 44.1kHz wav that you can post (upload) directly to the Internet (to your SOUNDCLOUD account).
Please see and hear this example:
Cloud Audio Recorder for Motif XF

Permalink